Vanilla Chocolate marble cake

Eggless Chocolate and vanilla marble cake. There’s nothing more luxurious that catching the two different layers of delicious vanilla and chocolate cake with a 2-in-1 delightful dessert. The most amazing part is that its the easiest ever recipe.

I used this gorgeous heart mold but you can use an 8 inch loaf tin as well. This recipe is tested as a loaf as well. Here’s how we do it.

For the Vanilla cake batter:
– 1 cup dahi (yoghurt/ curd)
– 1 cup caster sugar
– 1/2 cup veg/ neutral tasting oil
– 1 tsp vanilla extract

– 1 cup maida-AP flour
– 1/2 tsp of baking powder
– A pinch of baking soda
Method:

-Whisk the curd, caster sugar, vanilla and oil well together until the sugar dissolves completely.
– Then sieve in the maida and baking powder and baking soda
– The batter would be thick-ish to which add 1-2 tsp of water and mix to make a nice vanilla cake batter.

Now let’s move to the chocolate batter
For the chocolate cake batter, repeat the same recipe in a new bowl and to that add
– 3/4 cup of sugar
– 1/4 cup of dark cocoa
– 1 tsp water to bring the batter together.
– Preheat the oven at 180 degree c for 10 min and prep the greased loaf tin.
– Now spoon the vanilla and cocoa batter one after another so u get a Natural swirl. Bake for straight 45-48 min!!
– Dollop a mix of chocolate and biscoff sauce to make it even more decadent!! Enjoyyyy!

Chocolicious Oatmeal

A sinfully chocolatey oatmeal sans the sin??? Who would have thought !!! Yes, that’s my easy peasy chocolicious oatmeal for a happy breakfast treat for you. When I was a kid, and still developing some degree of refinement in my palette, I used to do these weird experiments in order to experience the best taste of chocolate. Dairy milk was my favourite and I still stand by the fact (yes, i think so!) that it tastes the best when its the first thing you put in your mouth after you wake up and BEFORE you brush you teeth! Yikes! I said it. I discovered this tasty secret as early as the age of 13 but you can get started on it now 🙂

Ok, let’s do a saner, healthier version of chocolate, for mornings after you brush your teeth and sit pretty on the dining table. A healthy oatmeal that doesnt even take tem minutes to make.

Ingredients:

  • 100gms of rolled oats
  • 1/2 cup of water
  • 1.5 tbsp of unsweetened cocoa powder
  • 3 tsp of jaggery
  • 1 tsp of vanilla extract
  • 1/2 cup of milk/almond/cashew milk
  • 1 tsp of crushed hazelnuts
  • 3-4 blueberries (optional)

Method:

  • In a pan, boil water and add oats to it. let it boil
  • Add jaggery and stir
  • As soon as the mixture becomes nice and gooey, add the milk little by little to make a nice, thickish oatmeal
  • Now add the vanilla and cocoa powder
  • Turn off the heat and now transfer the oatmeal into a breakfast bowl
  • Garnish with toasted hazelnuts, cacao nibs and some blueberries

This is a such a simple delicious vegan breakfast option as well which is to say that one can truly enjoy his/her diet choices without feeling any kind of restrictions. Doesnt chocolate really make everything better?

————————————————-

Baked Beets & Feta

Baby Beets once combined with the salty sharp feta cheese and baked is the most heavenly appetizer or even just a filling snack for one!

There’s something about the combination of vibrant purple-y red beets and the sharp white of feta cheese that makes it not just a delicious palette pleaser but also a sight to behold. And if there’s a little bit of basil involved then that’s a plate or in this case, a bake tray made in heaven.

I have rather fallen in love with these miniature bake trays that work wonderfully on a day when you need to satiate a party for two or better still, just yourself. It’s because of that I recommend you get one for yourself from the link here: https://nestasia.in/collections/bakeware

Now let’s get down to this lovely recipe, that take nothing more than 10 minutes to put together and about 20 in the hot oven.

Ingredients:

  • 2 baby beets, cut in thin circles
  • 50 gms of feta cheese
  • 2 tbsp of Extra virgin olive oil (including 1 for later)
  • 1 tbsp of balsamic vinegar
  • 10 gms of fresh basil
  • 1/2 tsp of rosemary (optional, but it does work wonders in the bake)
  • 1 bake tray/grill plate

Method:

  • First preheat the oven at 180 degree C fan, bake setting, for about 8 minutes
  • Now, take the bake tray and line it with 1 tbsp of oil and sprinkle rosemary on it.
  • Stack the beets all across the tray
  • Then crumble some feta cheese on top of the beet stack
  • Cut up some fresh basil atop the cheese
  • drizzle on another tbsp of oil
  • Put it in the oven and bake for 18-20 minutes or until the feta looks like its about to go brown.
  • pull it out and just drizzle a little bit of balsamic vinegar and serve… rather, gobble!!!!

Do let me know if you have tried this recipe out and were you happy with the results.

love, Anu

———————————————————-

Sesame Sticky Chicken

Sesame sticky chicken is just delighful for dinner or just as an accompaniment to chilled beer on hot summer day

I have to say, on days when Work From Home is even more hectic than working from office, I expect a bowl of chicken and rice to cook themselves and lovingly present in blue bowls and sit on the table, hot and fresh waiting for me, while I frantically answer mails and coordinate with teams to get the job done.

Alas, that’s not the case and I have to work hard and smart on most days of these grim times. Although I do find weekends to be a lot lesser load on the mind, clearing up space for this somewhat of a steps recipe. but let me tell you it is all worth the time (and a bit of extra washing 😉

So, Let’s get down to it.

This Recipe serves 4.

Ingredients to coat & fry the chicken

  • 4 tbsp Vegetable/olive cooking oil
  • 2 eggs – lightly beaten
  • 5 tbsp cornflour
  • 8 tbsp plain (all-purpose) flour, Maida
  • ½ tsp each of salt, pepper, onion powder and dry garlic powder
  • 2 tsp of Red chilli powder
  • 4 chicken breast fillets – cut roughly

Ingredients for the chicken sticky sauce:

  • 1 tbsp sesame oil. I love the nuttiness it brings to the sauce
  • 1 tbsp vinegar- take your pick. i prefer balsamic
  • 2 tbsp honey
  • 4 tbsp store bought tomato ketchup
  • 2 tbsp regular/brown sugar (gives better colour)
  • 1 tbsp minced garlic
  • 2 tbsp chilli sauce (chinese sweet chilli works best)
  • finally, 5 tbsp soya sauce

Method:

  • Take a thin bottomed pan/ wok and make sure its large!! now add the oil and wait for it to get really hot.
  • In the meantime, prepare the chicken for frying. take 3 soup plates and place the beaten egg in one, cornflour in the other & maida (AP flour) in the third plate.
  • To the flour you must add pepper, salt, onion, garlic powder and mix.
  • Now follow this routine for all the chicken breasts.
    • cover the chicken in cornflour
    • Then dunk it in eggwash thoroughly
    • finally drop it in the flour and cover well.
  • Add the chicken to the wok slowly and cook until the batter looks golden brown on both ends. you should need about 1-2 min on each side.
  • clear off excess oil by placing them on a plate lined with tissues/kitchen napkins.
  • Now take another hot wok and all the stuff required for the sticky sauce in it and let the flame do its magic. Wait for the sauce to reduce into a lovely, gooey brown stickyness.
  • Throw the fried chicken back in there. Coat the pieces really well with the sauce and finally transfer to a clean bowl
  • Sprinkle sesame seeds on the hot chicken liberally along with cut spring onions.

Serve this hot hot with boiled rice or fried rice.

Tip:

  1. You can easily do this recipe with chicken wings but spare yourself the trouble of frying it all up with all those number of coats. Just switch on the oven at 160 degrees C, Fan take a grill plate and place the chicken wings on it with a little brush of seasoning and sesame oil and place on the middle rack. 20 minutes in, they should be ready to dunk in the lovely sauce you made that takes not even 2-3 minutes. You can get your grill plate here https://nestasia.in/collections/bakeware
  2. I usually make an omelette with the remainder egg wash, take some sesame oil in the hot wok, fry up the boiled rice with a little garlic and add the egg to it.

Easy Oats-tray-Bake!

Oats baked with your favourite fruit mixed with an egg & a gorgeous lot of berries makes it a lovely brunch dish

Oats is such a versatile ingredient in the healthy food group that it can marry itself with anything sweet and savory to produce something beautiful. Yet, my family of three still has its own preferences on the breakfast table leaving me with little choice to eat what I really want to begin the day with.

But as I go through my book stash, I come across my ever so favorite Virginia Wolf’s ‘A Room of One’s own’ and that’s why I got myself a bakeware tray that serves just me! The joy of baking just for yourself is unmatched, especially when you are using the ingredients that are free of all things refined.

My tray bake for one is with oats, strawberries, almond milk and honey. let me show you how.

Ingredients: serves 2/ a hungry 1

  • 1/2 cup of instant/rolled oats
  • 1/4 cup of forest/raw honey
  • 1 egg
  • 1 tsp each of chia, flax & sunflower seeds
  • 7-8 pieces of strawberries/ 1 banana
  • 4-5 pieces of blueberries
  • 1 tsp of baking powder
  • 3 tbsp of milk/ almond milk
  • a tsp vanilla extract optional
Oats tray-bake with fruit for breakfast

Method:

  • In a blender drop in all the ingredients, barring 4 strawberries & blueberries and blitz away.
  • Now pour over the ingredients in a greased, prepped baking tray for one.
  • Top it with strawberries and blue berries
  • Now bake in a pre-heated oven in the middle rack, at 180 C/ 356 F for 10-12 minutes or until a skewer comes out almost clean.

Once out, you will notice the colorful thickened juices of the fruit oozing out of the bake that add so much gooeyness to this bake. Now you can give it a drizzle of maple syrup or just enjoy it all by yourself on your own, that too for Breakfast!!! yay 🙂

Love, Anu

———————————————————————————————-

Apple Pie Oatmeal!

Who doesn't love Apple Pie? this is a healthier breakfast option of apple pie oatmeal! yummy

Apple Pie!!!! The most amazing, full of flavors dessert that is fruity, deep, intense and all things gooey and crunchy but not without its own worry of sugar, both from the apple, the jus and the crust.

That is why I bring to you my version of breakfast Apple Pie!! Yes, its a gorgeous Apple cinnamon oatmeal that has the lovely taste of the pie its inspired by and the goodness of fibre from the oats, vitamins from flax & other seeds, and the fruit itself. This recipe is Vegan but you can make it with cow’s milk as well and Keto too.

Here’s how we do it!

Ingredients:

  • 1/2 crunchy apple
  • 1/2 cup water
  • 1 tsp cinnamon powder
  • 1/2 cup milk/ almond milk (vegan)
  • 4 tbsp of Quaker oats. You can find them here https://quaker.co.in/
  • 2 tsp of raw sugar/jaggery powder/ sugar free
  • 2 tsp of raw honey for topping
  • 1 tbsp of crushed almonds
  • 1 tsp of flax seeds
  • nicely cut apple for decoration.

Recipe:

  • Chop up half an apple and put it in half a cup of water. Switch on the heat and add the cinnamon powder.
  • Once softened, add half a cup of almond or regular milk and then add 4 tbsp of oats and cook.
  • Once the oatmeal is cooked, add 2 tsp of raw sugar/jaggery powder/keto substitute.
  • Switch off the heat and pour the gooey oatmeal to a cereal bowl and decorate with crushed almonds, fresh apples, seeds and blueberries with a little drizzle of forest honey!!

That is how you roll with rolled oats. I am doing a series of wonderful oatmeal options that you can do to make your breakfast meal brighter and healthier without compromising on the taste.

You can catch the video on my insta page :

https://www.instagram.com/p/CMt1Z3BpoMm/?utm_source=ig_web_copy_link

If you do happen to try this recipe, then do comment below and tag me to the instagram/ Facebook stories or feed with mylittlekitchen.in.

Love, Anu

Hot-chocolate Anytime!

Imagine! You fur-balling into a soft blanket on a comfy sofa , with your favorite book in your hands, soft jazz playing in the background, perfectly feathering a cozy winter day!! Ahhh! and then… just like that, it all comes together even more beautifully with a gorgeous, decadent hot chocolate! 

Uff! I am almost smelling the aroma of a deep intense hot chocolate that can totally pull you out of any kind of drudgery. So lets just get down to making these ready to dunk cubes of hot chocolate that you can store at room temp or even in the fridge for a few months and use in case of ‘choco-gency’!! (licensed from chocolate emergency 😉 yes! that’s a real thing! )

Ingredients

  • 500 gms of your favourite kind of chocolate
  • 200 gms of mini marshmallows
  • 100gms of rice crispies (optional) 
  • for setting- Eight 3 by 3 inches square chocolate moulds or cutting chai cups or small disposable tea cups &  Eight wooden spoons
  • A cup with 200 ml hot milk to dunk one these lovely choco cubes sticks in.

Method

  • Chop the chocolate in small pieces
  • Make a bain marie which is essentially a double boiler and melt the chocolate on low heat, so you get an equally melted hot chocolate.
  • You can add anything u like to the liquid chocolate- dry fruit, canned fruit, rice crispies or flavorings like hazelnut extract etc.
  • Let the chocolate come to room temperature before you pour them into small cups.
  • Stack the small plastic disposable paper cups/ square moulds on the counter and slowly pour the cooled down chocolate into them. 
  • Let it set a bit outside before refrigerating.
  • Once the chocolate reaches semi solid condition, take a wooden disposable spoon and insert in the center of the chocolate cup. It should be done with a chocolate consistency that the  spoon stays straight and doesn’t wobble down or slide out.
  • Now you can happily let this refrigerate till totally set or the chocolate takes the shape of the cup.
  • Once set, you can take the chocolate out of the plastic cup mold and wrap it in a tiny sheet with a small ribbon. 

You can use these chocolate on spoons to make instant hot chocolate/cocoa.

Just add 200 ml hot milk to your favorite mug or cup and dunk this spoon in it. Wait for it to melt slowly as you sip on the heavenly drink on a cold winter night.


Hot tip: you can always pack some mini marshmallows, a stick of cinnamon or peanut butter on top of the set chocolate. In that case, insert a disposable lollipop stick or wooden skewer in the chocolate while setting! It would add the extra touch to the gorgeously delightful cup of cocoa.   
Enjoy it!

Chocolate strawberry quick cake

Strawberries is all sorts of love! To me, there’s never enough strawberries in this world! No wonder then, this tingling sweet palette cleanser is such a hit when it comes to making desserts. Who doesn’t love strawberries and chocolate? Voila! I bring to you one of my favourite cake recipes. The best part about it is the texture. fluffy and moist, melt in your mouth goeey-ness!

This one here is special purely from the least amount of effort it takes to make it. Yet, its sinful, decadent with sweet and sour undertones of fresh strawberries & dark chocolate mixed in the batter.

Prep time: 10 minutes

Bake time: 35-40 minutes

In a blender, in no special order put together the following:

Ingredients

  • 1 + ½ cups maida (all purpose flour)
  • 1 + ½ cups castor sugar
  • 1 cup Greek Yogurt or homemade dahi (hung curd) or 2 eggs
  • ¾ cup cocoa powder
  • ¾ cup vegetable oil or any neutral flavor oil
  • 1/2 cup buttermilk or ½ cup milk + 1 tsp white vinegar, mixed & kept aside for about 15 minutes
  • ½ tsp baking soda
  • 1 tsp baking powder
  • ½ tsp vanilla extract

Keep aside

  • 1/2 cup chopped strawberries
  • 1/2 cup (slit sideways) to put on top for good looks 🙂
  • 1/2 cup chocochips

Method

  • Blend all the ingredients other than strawberries and chocochips on High until the batter looks like a nice thick-ish slurry,
  • Add the chopped strawberries and choco-chips to the batter
  • Prepare a 9 inch square tin with parchment/baking paper and buttered sides. It’s the part I dislike the most during a bake sess!
  • Preheat the oven at 180 Degrees Celcius, middle tray for about 5-7 min.
  • Now pour the batter in the tin and decorate with the slit strawberries in the pattern of your choice.
  • Tap it thrice (for luck! haha!) against the counter to ensure all air bubbles are out.
  • Move to the oven and bake for a good 40 minute, checking at the 35 minute mark with a skewer or large toothpick. If the batter coats more than half the skewer then give it another 7-10 minutes in the oven.
  • Once the skewer comes out mostly clean, pull out from the oven and place on a cooling rack for about 30 minutes.
  • Once cooled you will notice an crispy, crunchy top yet when you cut into it, the gooey moist inside would be simply irresistible.
  • Pull out on a lovely cake stand or plate and enjoy with Tea or coffee or for all you care, with Wine. I think a cool Rose would go really well with it.

So no mixing bowls, no kitchen aid, just a good old blender, chocolate, strawberries & you 🙂

If you do happen to make this recipe, please do click a pic or two and write your review in the comments section. You can also tag me on Instagram @mylittlekitchen.in or Facebook with the same handle. Happy Lazy baking!!!

Grilled prawns atop yogurt dip

Tried my hand at making grilled prawns atop a Greek yogurt dip. The modern plating is inspired by the restaurants visited recently.

For the marinade:
1 tbsp of Harissa paste (as per your threshold of handling chili)
1/2 tbsp of ginger garlic paste freshly made
3-4 sprigs of original and dried rosemary & thyme
1 lemon zest 
salt & black pepper to taste
Make sure you add no lemon juice to it as that may harden up the prawn flesh. Marinate the prawns for about 30 minutes. 
For the yogurt dip:
1 cup thick creamy Yogurt- you can try using hung curd as well
6 cloves of garlic chopped and minced
a bunch of fresh chives 
salt and pepper.   
how we do it:
On a long rectangular white plate just spoon and spread the dip first and keep ready. Prawns should be grilled on skewers only for 2-3 minutes max both sides or depending on the size. Once they catch color put on top of cold dip. Garnish with more chives and dried mint.  And serve immediately.
love Anu 


MEAT THE BAN

Anda, machhi, chicken! Naam bhi matt lo, BAN hai!
Recently we have been ‘told’ what we should NOT be eating. The beef ban in Maharashtra was a ‘dream come true’ according to a senior minister. And now, all those who were supporting that ban are also in for a shock as the government has again decided a four day meat ban during the Jain paryushan. While it is wise and nice to be sensitive to all communities and cultures in our country, this excuse is clearly pushing it too far. We are not just being told but dictated as to what should be eaten in the pious country of India.
Many Ban-believers forget that Indian cuisine is most popular in the world because of its ‘Butter Chicken’ and ‘Balti curry’ both of which are meat dishes. Popular or not, most importantly we as free citizens should not have to fight the battle of food choices! And that is why I bring to you a unique way of ‘meating’ this ‘ban’ by giving you some non-veg recipes that you can make and enjoy albeit even more ravenously to make the point J
Butter Chicken
As I Said, the pride of Punjab ‘Sadda butter chicken’ is one of the best and the most sinful creations that the world and its cousins love. Yeah I heard some stories about aliens relishing it too..haha!
Can you believe it that Butter chicken was invented by accident at Moti Mahal Restaurant in Daryaganj, New Delhi? I bring to you the same recipe of this joyful creation which delivers for me every time.
butter chicken 

1 kilo chicken Marinated in half a tsp of red chilli powder, one tsp of finger garlic paste, half a kilo of dahi (curd) and salt to taste.  While the chicken marinates put together the following for the gravy.

175 gms regular or preferably white butter, ½ kg of tomato puree- blanched, skinned and deseeded, 100gms fresh cream, 4-5 green chillies sliced from the middle, ½ tsp each of sugar, jeera, red chilli powder, kasuri meethi and finally salt to taste.
Make sure that the chicken is marinated and refrigerated for at least 6 hours or overnight before you put it in the oven. A clay oven is ideal but I use regular oven (preheated) at 180 degrees and full power to roast the chicken for 15 min until it’s just a little underdone.
Now add half the butter in a kadhai and pour in the tomato pureee. Saute of 3-5 minutes and add all the masalas. Now add the roasted chicken, white butter, the fresh cream, chillies and kasuri methi. Now keep cooking the gravy until the chicken is completely cooked. Now serve hot with Nan. Life set!
Sali per Eedu
Mumbai Bawajis are known for breaking an egg on everything possible. But this eedu (egg) recipe is arguably the best in the Parsi Bhona treasure trove. It’s so simple yet a bit tricky. This recipe is essentially fried egg on top of fried potato chips/shavings.
Sali-per-eedu
It’s tricky because while the egg cooks through, the Sali must not burn or steam up to being soft instead of crunchy J
All you need for this is eggs and potato Sali,the thinner the better. Now, heat a tsp of ghee/ unsalted butter and add sali-potato chips in the pan so that they form a circle on top of which you have to break an egg. That would be just the same way as you would do when you make fried eggs.
Sprinkle 2-3 drops of water on the egg (not the Sali) and cover the pan. In about 30 sec, the egg would get some color and it’s ready to eat. Lastly, season it well and ensure that the potato shavings do not become soggy before you serve.
 
 
Tandoori Fish
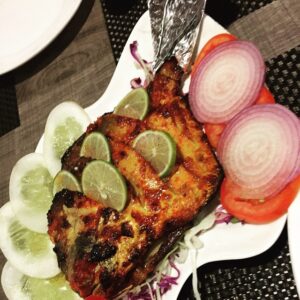
This fish recipe is by far my most favourite. It is also a hot favourite of fitness addicts too. Low in calories, it packs in a punch of flavour. All you need is a whole big white fish, preferably a pomfret, half a kilo.
Now for the marinade: take 6-7 cloves of garlic, 2 tbsp coriander leaves, 2 inches ginger, 2tbsp Lime juice, 1tbsp Kashmiri red chili powder, ½tsp jeera powder, 1/2tbsp garam masala, 1 ½tsp salt, 50ml Refined vegetable oil, 1tbsp ‘roasted’ Gram flour, 100g thick dahi.
 Take all the ingredients (other than oil and curd) and blitz in a mixer to make a fine paste. Add to the oil and dahi and make a thick paste. Now marinate the fish by giving it 3 slits in the middle. Make sure you rub the marinade in the fish as well for even coating. Keep the marinated fish for 1 hour.
Now pre heat the oven at 200 degree C. Put the Fish on the top rack for 7-8 minutes, turning it once after 3 minutes. If you don’t want to use the oven, you can simply put it on thetawa and oil grill it. Baste it well with the marinade during cooking. Serve will lemon segments stuffed between slits and some garden salad.
With that I hope you do explore at least one of these recipes during these four days. It would not just add vivid aromas to your home kitchen but will also reiterate your freedom to ‘Meat the ban’ the way you like it J